Why New Bike Brake Pads Squeak — Bedding In, Contamination Or Wrong Pads
As an Amazon Associate we earn from qualifying purchases. This page contains affiliate links — if you buy through them, we earn a small commission at no extra cost to you.
New pads need a short run-in to lay an even layer on the rotor, so early squeal can be part of that process. Instead of smooth stops, you get a high-pitched screech that makes you wince every time you pull the lever. The bike stops fine—the power feels good—but the noise is doing your head in.
The good news: squeal from new pads is almost always fixable, and it usually doesn’t mean anything is wrong. What’s happening is a predictable physical process that takes time, and you can check a few things yourself before assuming the pads are duff. This guide walks through the most common causes, in the order you should rule them out.
Checking the Basics First
Before diving into bedding-in, rule out simple mechanical issues. These are surprisingly common and quick to check.
- Oil or grease on the rotor or pads — look for dark patches, a shiny film, or any residue that doesn’t look like normal brake dust. This is a frequent cause of sudden squeal, especially after cleaning your bike or lubricating the chain.
- Loose caliper bolts or mount — give the caliper a gentle wiggle by hand. If it moves at all, the bolts need tightening. Intermittent squeal that comes and goes often points to this.
- Uneven pad wear — remove the wheel and look at the pad surface. It should be flat across its whole face. If one edge is worn more than the other, the pad may be misaligned.
If none of those apply, the issue is likely that the pads haven’t been bedded in properly.
Cleaning the Rotors and Pads
Before starting the bedding-in process, ensure the braking surfaces are free from contamination. Home mechanics often introduce brake squeal after a chain lube session or by using the wrong cleaner near the rotor.
Use a dedicated brake cleaner or isopropyl alcohol on the rotor and both sides of the pad. Spray the rotor while spinning it slowly by hand, then wipe everything dry with a clean cloth—no residue. The Muc-Off Disc Brake Cleaner (paid link) is one option available in a workshop-sized can suitable for regular maintenance.
See Muc-Off Disc Brake Cleaner on Amazon → (paid link)
Do not use WD-40, chain lube, or any general-purpose lubricant on braking surfaces. Lubricant on a rotor contaminates it, creating inconsistent friction that triggers high-frequency vibration and squeal. The fix for that mistake is thorough cleaning.
Once the rotors are clean and dry, you can begin the bedding-in process.
Understanding the Bedding-In Process
Disc brakes create friction through a transfer layer—a thin, even film of pad material that deposits onto the rotor surface as you brake. When that layer is uniform, the pad contacts the rotor evenly and there is no vibration. When it’s not there yet, patches of bare metal touch intermittently, producing high-pitched squeal.
Skipping the bedding-in process doesn’t just risk noise; it can mean weak braking for the first few rides while the layer builds up unevenly.
Shimano’s guidance for hydraulic disc brakes recommends a specific procedure:
- Find a flat, safe area where you can build up speed several times.
- Ride to a moderate speed, then apply the front brake firmly until you’re down to walking pace. Repeat at least 20 times.
- Do the same with the rear brake.
- Allow the rotors and pads to cool completely.
The key is even pressure and repeated moderate braking rather than one hard stop. Hard braking overheats the new pad surface before the transfer layer has formed, which can cause glazing—a shiny, hard surface that resists proper bedding-in. If glazing occurs, clean the pads again with isopropyl or brake cleaner before retrying.
When Bedding-In Isn’t Enough
If squeal persists after proper bedding-in and you’ve ruled out contamination and loose bolts, consider alignment or pad compound.
Bolt tightness — Check the caliper mounting bolts and rotor fixing bolts with an appropriate hex key. They need to be snug. Heat cycling from your first ride can work them loose slightly.
Pad alignment — The pad should contact the rotor with its full face, not just one edge. On some calipers, you can centre the caliper by loosening the mount slightly, squeezing the brake lever to hold it centred on the rotor, then retightening while holding the lever. This is often a two-minute fix.
If the noise remains, the pad compound might not suit your conditions. Resin pads are quieter in dry conditions but can be more prone to squeal in wet weather. Sintered metal pads handle wet and muddy conditions better but can be noisier on dry roads. Switch compounds only after exhausting the cheaper fixes.
Common Questions Answered
Is brake squeal dangerous?
Usually not. Squeal is a vibration problem, not a friction problem. If your brakes stop the bike reliably and the lever feel is solid, the squeal is annoying rather than a safety issue. If the brakes feel spongy or stopping distance has increased, check for contamination or pad wear.
Can I use WD-40 to clean my brakes?
No. WD-40 is a lubricant and will contaminate your pads and rotor. If you’ve done this, apply isopropyl alcohol or a dedicated brake cleaner to both sides of the rotor and the pad surface, wipe clean, and allow to dry fully. Squeal from lubricant contamination won’t clear up on its own.
Do I need to replace the pads, or can I fix the squeal?
In most cases, squeal is fixable without replacement. The process is: clean the rotor and pads → check bolt tightness → check pad alignment → bed the pads in properly. Only if none of these steps work, and the pads show uneven wear or are near minimum thickness, should replacement be necessary.
Bedding-In Process Reference
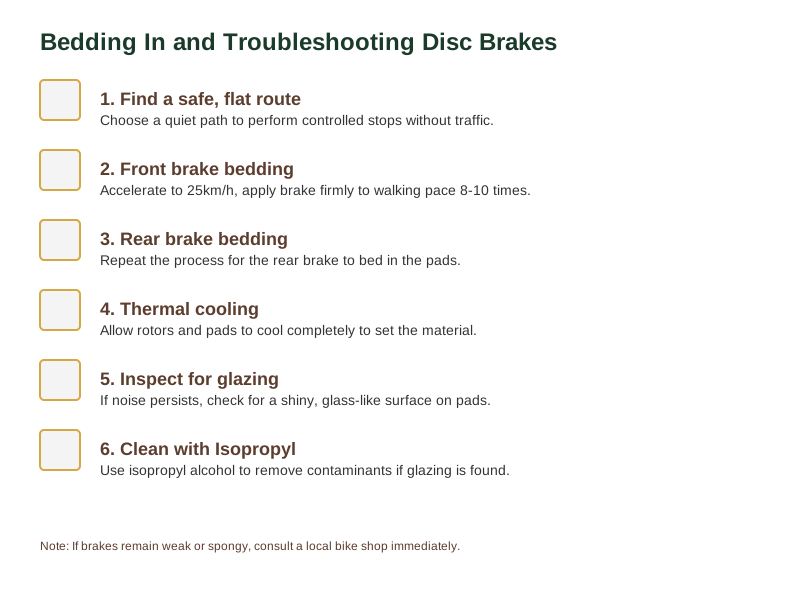
To bed in new pads properly, first find a flat, safe stretch of road. Accelerate to about 25 km/h and apply the front brake firmly until you slow to walking pace; repeat this 8-10 times. Then do the same for the rear brake. Allow the rotors and pads to cool completely. If squeal persists, check for glazing—a shiny surface on the pad—and clean the pads with isopropyl alcohol if necessary.
Final Checks and Next Steps
After the run-in rides, the pad should show a uniform shiny band matching the rotor. If it does and the squeal has gone, the bedding-in was successful. If not, revisit the contamination and alignment checks.
The sequence is simple: clean first, then check alignment and bolts, then bed the pads in properly. Most squeal resolves within the first couple of rides once the transfer layer has formed.
Avoid assuming the pads are faulty and buying replacements straight away. New pads will squeak just the same if the underlying issue isn’t addressed.
Now you know what to check and in what order—Get the Free Bike Care Checklist to keep these steps to hand. For a deeper look at persistent noise, see our guide on Why Are My Bike Brakes Squeaking — And What Actually Stops It? .
Sources & Further Reading
- Shimano Hydraulic Disc Brake System Manual - Bedding-in procedure.
- Cycling UK - General maintenance advice.
- Muc-Off - Product information.
As an Amazon Associate we earn from qualifying purchases. The products linked above are ones we think are worth a look.
Note: General guidance only, verify details with a qualified professional or official source.