How Much Air Should I Put In My Bike Tyres — Pressure Guide By Bike Type
As an Amazon Associate we earn from qualifying purchases. This page contains affiliate links — if you buy through them, we earn a small commission at no extra cost to you.
Every tyre has its safe pressure range printed on the sidewall—that’s your starting point. The right number depends on your weight and the surface you’re riding, but it must stay within that printed range. On UK roads, that usually means aiming for the lower end to keep the tyre compliant over rough surfaces.
High pressure feels fast and firm, but on cracked tarmac and patchwork roads, it makes the bike bounce and skitter rather than grip. The tyre barely conforms to the road surface, sacrificing comfort and control for a theoretical speed gain that rarely materialises on real-world routes.
This guide explains how to find your tyre’s safe range and choose the right pressure within it for your bike type and riding conditions.
Understanding tyre pressure limits
The numbers stamped on your tyre sidewall aren’t suggestions—they’re engineering limits. The MIN pressure marks the point below which you risk pinch flats and rim damage under normal load. The MAX is the structural limit; exceed it and the tyre can bead off the rim under hard cornering. Exceeding the maximum pressure makes the tyre rigid, reducing grip particularly on damp roads, and at extreme pressures, there’s risk of the bead unseating from the rim. Always respect the sidewall MAX.
If a general guide suggests 80–100psi but your tyre says MAX 85psi, the tyre wins. The sidewall numbers define the safe working range for that specific model, and they take priority over any generic advice.
Finding your pressure within the range
Within your tyre’s safe range, the ideal pressure balances grip, comfort, and rolling resistance. For most UK riding, lower pressures work better than you might expect.
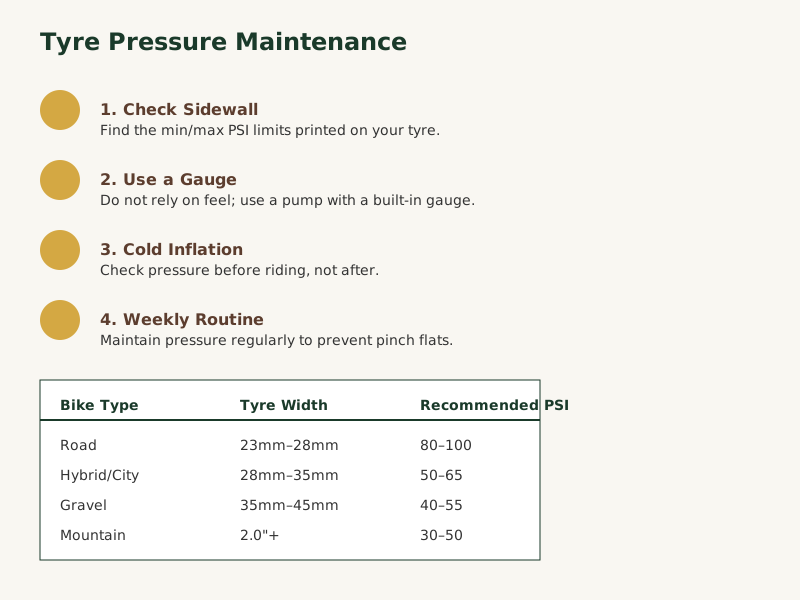
Road bikes (23mm–28mm tyres): 80–100 PSI Older cycling advice often suggests 110–130psi for racing conditions. On typical UK roads, 80–100psi provides better grip and comfort without noticeable speed penalty. Start at the higher end if you’re heavier or riding smoother surfaces.
Hybrid and city bikes (28mm–35mm tyres): 50–65 PSI Many riders run hybrids at 80–90psi, but dropping to 55–60psi transforms the ride quality on urban surfaces. The bike settles into the road rather than skating over imperfections.
Mountain bikes (2.0"+ tyres): 30–50 PSI On anything other than smooth gravel, 30psi is where MTB tyres start working properly. The tread needs to flex and conform to loose or muddy surfaces—higher pressure makes them slide.
Gravel bikes (35mm–45mm tyres): 40–55 PSI A middle ground between road and MTB pressures—enough support to avoid pinch flats while maintaining compliance on mixed terrain.
Pressure adjustment for different conditions
The printed range accounts for tyre safety, but you still need to adjust within that range based on riding conditions.
Smooth tarmac or cycle paths allow pressures toward the higher end of your range. The reduced rolling resistance becomes noticeable on consistent surfaces.
Rough roads, cobbles, or off-road terrain demand lower pressures. Drop 5-10psi within your safe range to improve grip and comfort. The tyre will conform to surface irregularities rather than bouncing over them.
For heavier riders (combined bike and rider weight over 90kg), add 5-10psi to the standard guidance as a starting point. The extra load compresses the tyre more at any given pressure, bringing you closer to the pinch-flat threshold.
Checking pressure accurately
Relying on hand-squeeze tests leads to over-inflation. A tyre at 60psi and another at 90psi feel similar through quick compression. Use a proper gauge for accurate measurement. Check pressures at least weekly, or before longer rides, as butyl tubes typically lose 5-10psi per month through normal permeation.
A floor pump with a built-in gauge works for regular checks. Some pump gauges can be inaccurate—consider verifying against a standalone digital gauge occasionally. While you can use a car pump, they deliver high volume quickly and lack precise gauges, so use with caution and check frequently with a bike-specific gauge.
Check tyres when cold, as riding heats the air and raises pressure readings. Attach the pump firmly to avoid air loss during inflation. For Presta valves, unscrew the locking nut before connecting the pump—forgetting this is the most common reason pumps won’t build pressure. Note that 1 bar equals approximately 14.5 PSI, and most UK pumps display both units.
Tubeless considerations
Tubeless setups change the equation significantly. Without an inner tube to pinch, you can run lower pressures safely—often 25–35psi for gravel and trail riding. This improves grip and comfort noticeably.
Tubeless systems can hide slow leaks that only become apparent during rides. Check pressures before each outing, as the sealant may mask gradual pressure loss between rides.
Recommended starting pressures
| Bike Type | Tyre Width | Recommended PSI |
|---|---|---|
| Road | 23mm–28mm | 80–100 |
| Hybrid/City | 28mm–35mm | 50–65 |
| Gravel | 35mm–45mm | 40–55 |
| Mountain | 2.0"+ | 30–50 |
Adjusting for your ride conditions
Stay within your tyre’s sidewall range but adjust for surface conditions: move a few PSI lower for rough roads and higher for smooth lanes. This simple adjustment makes more difference to comfort and control than any other single maintenance task.
For complete puncture repair techniques, see our guide to fixing punctures . The free Bike Care Checklist covers tyre pressure alongside other regular maintenance checks worth keeping on top of.
Related Guides
- How To Fix A Puncture On A Bike — Patch, Plug Or New Tube
- Why Does My Bike Tyre Keep Going Flat — Finding The Real Cause
References
As an Amazon Associate we earn from qualifying purchases. The products linked above are ones we think are worth a look.
This information is for general guidance only. Always verify specific tyre pressure limits by checking the manufacturer’s markings on your tyre sidewall.